Using Channels with LiveView for Better UX
By Sophie DeBenedetto | Posted 2019-06-04
By pairing a custom Phoenix Channel with our LiveView, with the help of a Registry, we can respond to LiveView events with custom JavaScript on the client-side to provide better UX.
LiveView has given us the ability to implement flexible and responsive UX almost entirely with server-side code. But what happens when our need for a responsive UI surpasses what LiveView seemingly offers? When the demands of a particular feature have us reaching for JavaScript? It is possible to incorporate custom JS into the LiveView life cycle with the help of a custom LiveView channel and a Registry. Keep reading to see how we did it!
The Problem
In a recent post, we built a straightforward chatting application backed by LiveView, PubSub and Presence. We implemented nearly all of the necessary features (live updates as users type in new messages, a list that keeps track of users in the chat room and who is typing!) with only 90 lines of LiveView code.
But then we ran into a blocker.
When new chat messages were appended to the chat window, they appeared just out of frame.
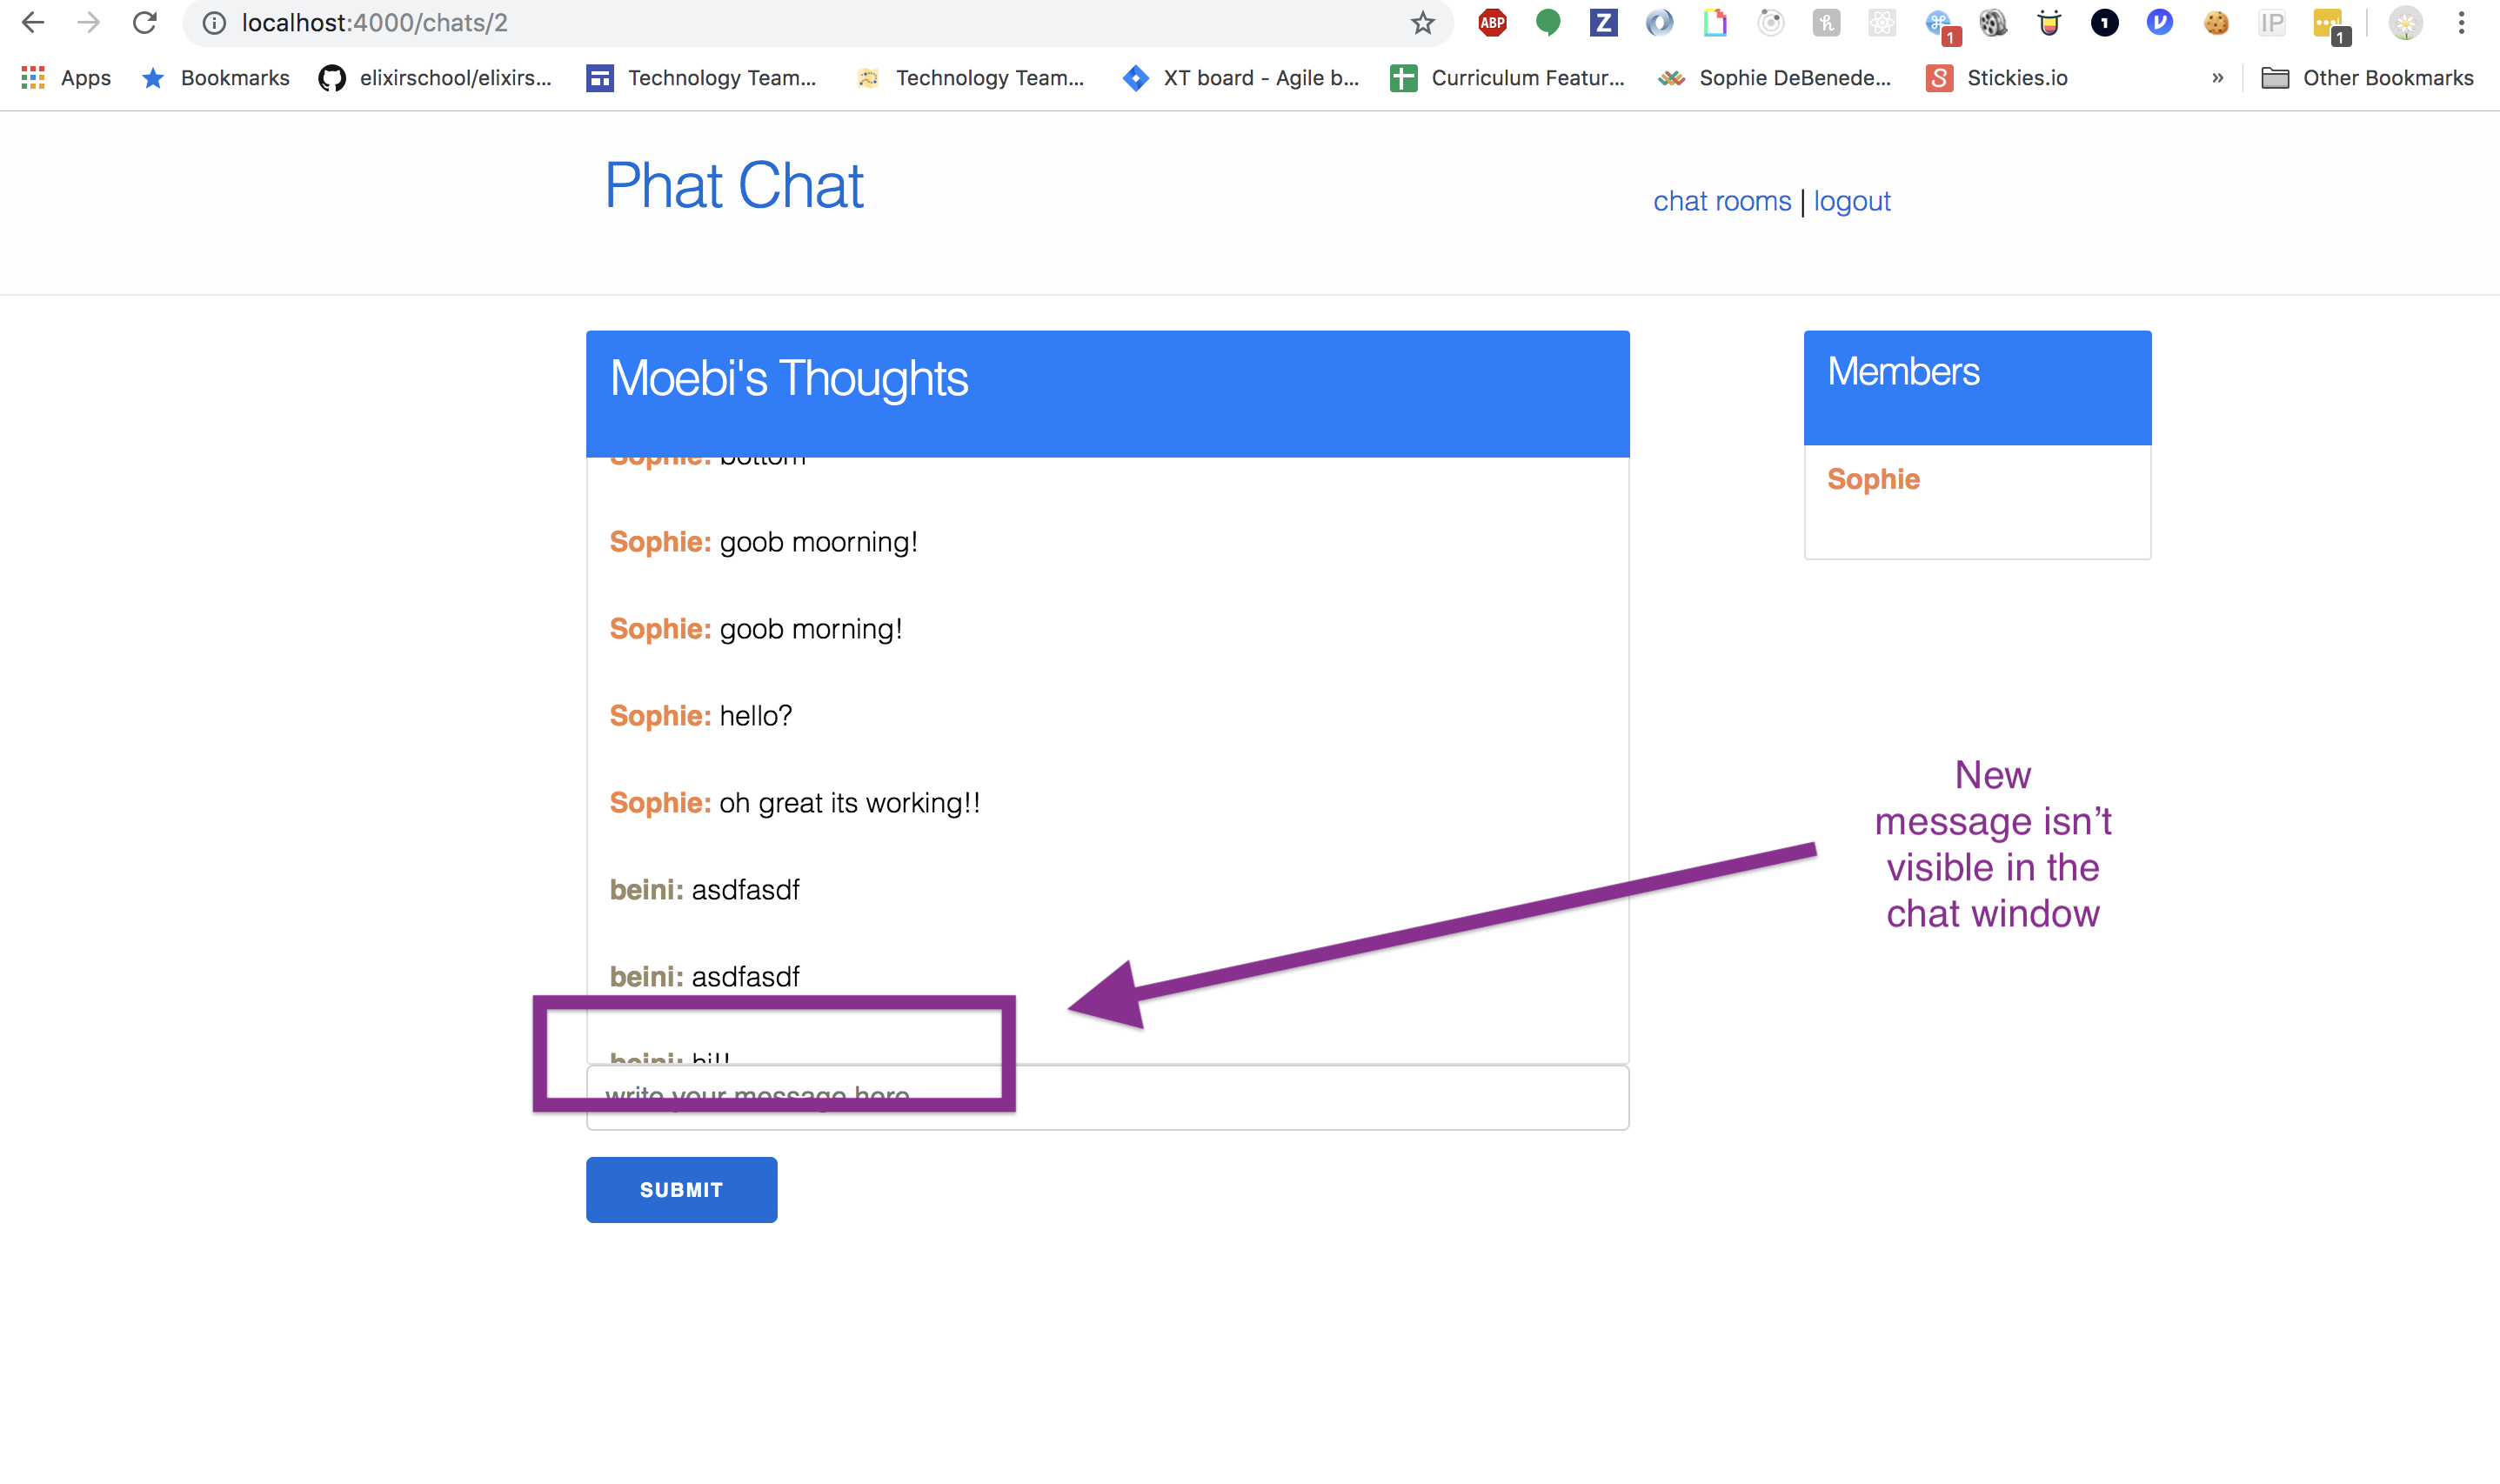
The chat window needed to scroll down to accommodate and display the new message. This is easy enough to do with just one or two lines of JavaScript: grab the height of the chat window, and set the scrollTop accordingly.
If you’re familiar with Phoenix Channels, you might reach for something like this:
channel.on("new_message", (msg) => {
  const targetNode = document.getElementsByClassName("messages")[0]
  targetNode.scrollTop = targetNode.scrollHeight
})
But wait! The LiveView client-side library only responds to one event from the LiveView process running on the server––the diff event. This event isn’t granular enough to tell us what changed on the page. It merely forces the appropriate portions of the page to re-render.
So, how can we get our LiveView to emit an event that our front-end can respond to in order to fire our scrollTop-adjusting JS?
The Solution
We need to do a few things in order to get this working:
- Extend the LiveView socket with a custom channel
- Teach our LiveView processes to send messages to that channel, so that the channel can push them to the client.
It’s worth noting here that the responsibility of a custom LiveView channel should be narrowly scoped. LiveView can and should handle almost all of the updates to the LiveView template. That’s the beauty of LiveView! We don’t need to write a set of custom client-side functions for updating the page based on specific events like we’ve become used to doing when working with Phoenix Channels. However, when we need to trigger a client-side interaction, like our scrollTop adjustment, that the LiveView client isn’t capable of handling, we can reach for a custom channel.
Now that we have a basic understanding of the problem we’re trying to solve, and the tools we’ll use to solve it, let’s get started!
The Process
Before we start writing code, let’s walk through the desired code flow of this feature, one step at a time.
-
User visits
/chats/:id - Controller mounts the live view and renders the static template
- Client connects to the Live View socket and joins a custom channel on this same socket
Later…
- User submits new chat message, sending an event to the live view
- The live view responds to the message by updating state, re-rendering the page and broadcasting the event to the other live view processes subscribing to that chat room topic
- The other live views receive the broadcast, update their own state and re-render the template
- The live views send the message to their “associated” channel (i.e. the channel joined on the live view’s socket)
- The channel receives the message and pushes it out to the front-end
-
Front-end receives the message and responds by triggering our
scrollTopadjustment JavaScript
There is a lot of code to get through, so we’ve organized our approach into the following parts:
I. Establishing the Socket and Channel
II. Handling Events in the LiveView
III. Communicating from the LiveView to the Channel
IV. Sending Messages From the Channel to the Front-End
Getting Started
If you’d like to follow along with this tutorial, we recommend reading and completing the tutorial in our previous post here first. This will get your code into the correct starting state. You can also clone down the repo here to get the starting code. Otherwise, you can checkout the completed code here.
Part I: Establishing the Socket and Channel
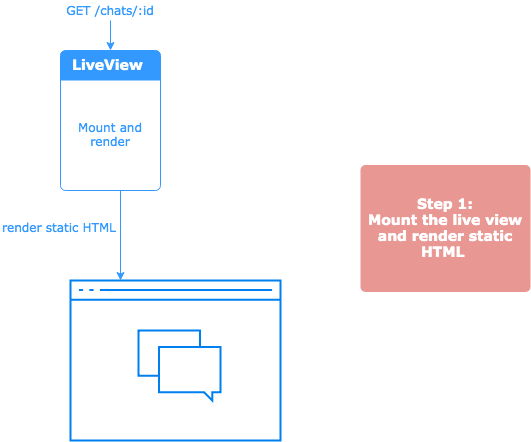
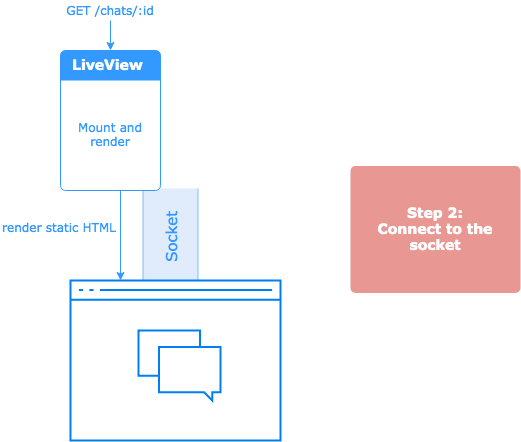
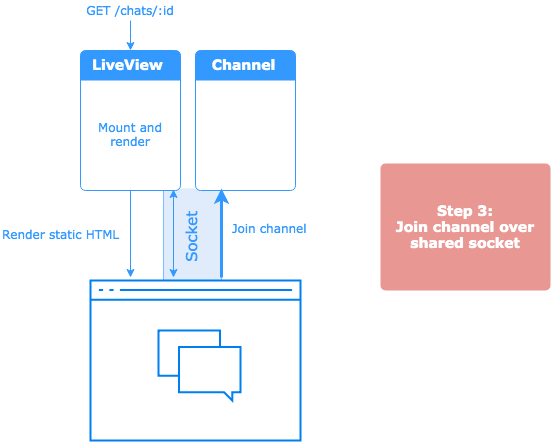
In order to guarantee that the live view process can send a message to the right channel at the right time, we need to have the live view share a socket with that channel. Let’s start by focusing on this portion of the code flow:
-
User visits
/chats/:id - Controller mounts the live view and renders the static template
- Client connects to the Live View socket and joins the channel on this same socket
Here’s a closer look at how this procedure works:
Let’s dive in and write some code!
Extending the LiveView Socket
In order to define a custom channel that will share a socket with our LiveView process, we need to extend the LiveView socket that the LiveView library provides us. LiveView doesn’t (yet) provide a way for us to extend this module programmatically, so we’ll define our own socket with everything it needs to support our LiveView and our custom channel:
# lib/phat_web/channels/live_socket.ex
defmodule PhatWeb.LiveSocket do
@moduledoc """
  The LiveView socket for Phoenix Endpoints.
  """
  use Phoenix.Socket

  defstruct id: nil,
            endpoint: nil,
            parent_pid: nil,
            assigns: %{},
            changed: %{},
            fingerprints: {nil, %{}},
            private: %{},
            stopped: nil,
            connected?: false

  channel "lv:*", Phoenix.LiveView.Channel
  channel "event_bus:*", PhatWeb.ChatChannel

  @doc """
  Connects the Phoenix.Socket for a LiveView client.
  """
  @impl Phoenix.Socket
  def connect(_params, socket, _connect_info) do
    {:ok, socket}
  end

  @doc """
  Identifies the Phoenix.Socket for a LiveView client.
  """
  @impl Phoenix.Socket
  def id(_socket), do: nil
end
The only line we need to add in addition to what we’ve copied from the LiveView source code is the channel definition in which we map the topic, "event_bus:*" to our soon-to-be-defined custom channel.
channel "event_bus:*", PhatWeb.ChatChannel
Next we’ll tell our app’s Endpoint module to map the socket mounted at the "/live" endpoint to the socket we just defined:
# lib/phat_web/endpoint.ex
defmodule PhatWeb.Endpoint do
  use Phoenix.Endpoint, otp_app: :phat
  # socket "/live", Phoenix.LiveView.Socket
  socket "/live", PhatWeb.LiveSocket
  ...
end
Defining the Custom Channel
Now we’re ready to define our ChatChannel:
# lib/phat_web/channels/chat_channel.ex

defmodule PhatWeb.ChatChannel do
  use Phoenix.Channel
  def join("event_bus:" <> _chat_id, _message, socket) do
    {:ok, socket}
  end
end
Connecting to the Socket and Joining the Channel
With our socket and our channel defined, we can tell the front-end client to join the channel after connecting to the LiveView socket:
// assets/js/app.js
import LiveSocket from "phoenix_live_view"

let chatId = window.location.pathname.split("/")[2] // just a hack to get the chatId from the route, there are definitely better ways to do this!

const liveSocket = new LiveSocket("/live")
liveSocket.connect()

let channel = liveSocket.channel("event_bus:" + chatId, {})
channel.join()
        .receive("ok", resp => console.log("joined", resp))
        .receive("error", err => console.log("joining failed", err));
Now, when the page loads, we will:
- Connect to and start the LiveView process running over the socket
- Join a channel over that same socket
Later, we can write some code on the front-end to respond to a specific event by changing the chat box’s scroll height:
channel.on("new_message", (msg) => {
  targetNode = document.getElementsByClassName("messages")[0]
  targetNode.scrollTop = targetNode.scrollHeight
})
So, how can we get our channel to send the "new_message" event to the front-end? Let’s find out!
Part II: Handling Events in the LiveView
In this section, we’ll dive into the following portion of the process:
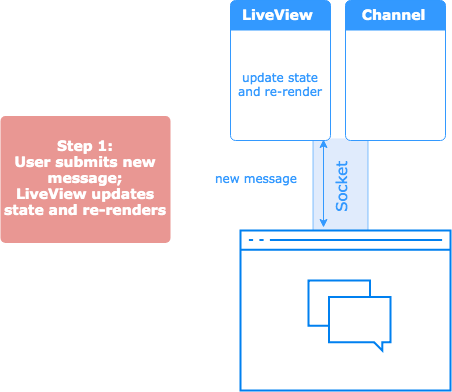
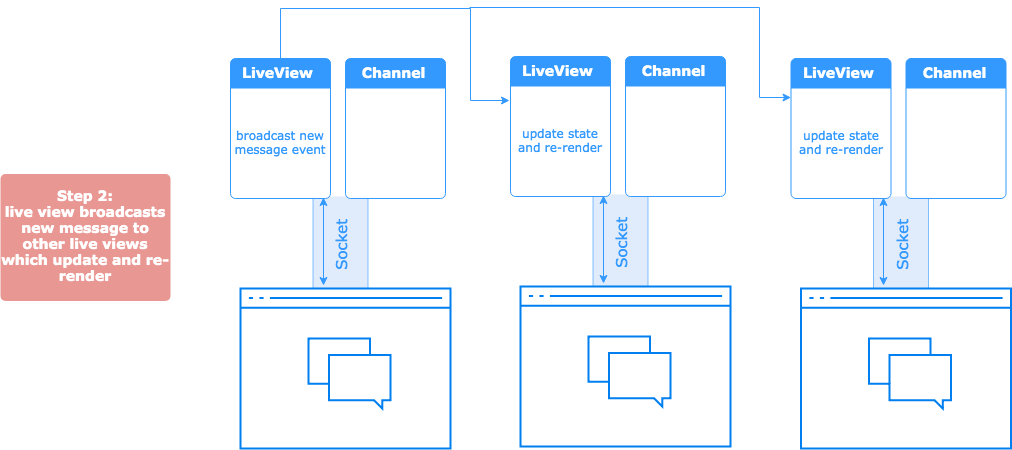
- User submits a new chat message, sending an event to the live view; The live view updates its state and re-renders the template
- The live view broadcasts the event to the other live view processes subscribing to that chat room topic which then update their own state and re-render their templates
- The live views send a message to themselves, instructing them to in turn send a message to their “associated” channel (i.e. the channel joined on the live view’s socket). This ensures that the live view will finish re-rendering before telling the channel to push a message to the front-end.
Here’s a closer look at this flow:

Receiving Events in the LiveView
When a user submits a new message via the chat form, it will send the "new_message" event to the LiveView process, over the socket. Our live view process already responds to this message by:
- Updating its own state and re-rendering the template to display the new message.
- Broadcasting the message to the other running live view processes subscribed to the same topic so that everyone gets the new message and subsequent re-render.
To get a refresher on how this works, check out our earlier post here. In this post, we’ll just take a brief look at that code:
# lib/phat_web/live/chat_live_view.ex

# this function fires when we receive the "new_message" event from the front-end
def handle_event("new_message", %{"message" => message_params}, socket) do
  chat = Chats.create_message(message_params)
  PhatWeb.Endpoint.broadcast(topic(chat.id), "new_message", %{chat: chat})
  {:noreply, assign(socket, chat: chat, message: Chats.change_message())}
end

# this function fires when all of the subscribing live view processes receive the broadcast from above
def handle_info(%{event: "new_message", payload: state}, socket) do
  {:noreply, assign(socket, state)}
end
Its important to note that the live view is broadcasting the message to all of the LiveView processes subscribed to the chat room’s topic, including itself. However, LiveView is smart enough not to re-render a page for which there are no diffs, so this isn’t an expensive operation.
Sending Messages from the LiveView to the Channel
We need to ensure that the page has a chance to re-render before we have the channel send the message to the front-end. Otherwise the JavaScript function to adjust scrollTop might run before the new message is present on the page, thereby failing to actually make an adjustment to the chat window.
After this handle_info/2 function returns is the point at which we can be sure all LiveView templates are re-rendered:
def handle_info(%{event: "new_message", payload: state}, socket) do
  {:noreply, assign(socket, state)}
end
So, how can we make sure each LiveView process handling this message will only send a message to the channel after this function finishes working? We can use send/2 to have the live view send a message to itself! Since a process can only do one thing at a time, the live view process will finish the the current work in the handle_info/2 processing the "new_message" event before acting on the message it receives from itself.
def handle_info(%{event: "new_message", payload: state}, socket) do
  send(self(), {:send_to_event_bus, "new_message"})
  {:noreply, assign(socket, state)}
end

def handle_info({:send_to_event_bus, msg}, socket) do
  # send a message to the channel here!
  {:noreply, socket}
end
Now we’ve captured the moment in time at which to send a message from the LiveView process to the Channel process. But wait! How can we send a message to a process whose PID we don’t know? The LiveView process, in its current form, doesn’t know about the channel process with which it shares a socket. In order to fix this, we’ll need to leverage a Registry.
Part III: Communicating from the LiveView to the Channel
In this section, we’ll register our channel process so that the live view can look up and send a message to the appropriate channel PID. Then, we’ll teach the live view how to perform this lookup and send a message to the right channel PID.
Here’s the code flow we’re aiming for:
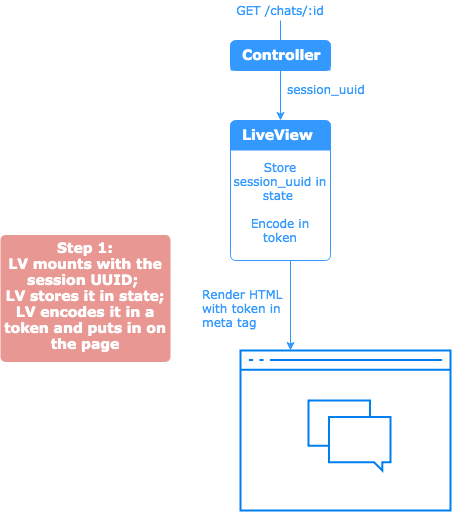
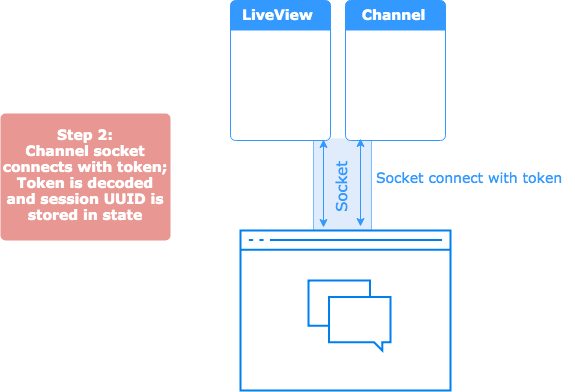
-
The LiveView is mounted from the controller and stores a unique identifier of a “session UUID” in its own state; it renders the template with a hidden element that contains the session UUID encoded in a
Phoenix.Token - The channel’s socket is connected with this token; the socket stores it in state.
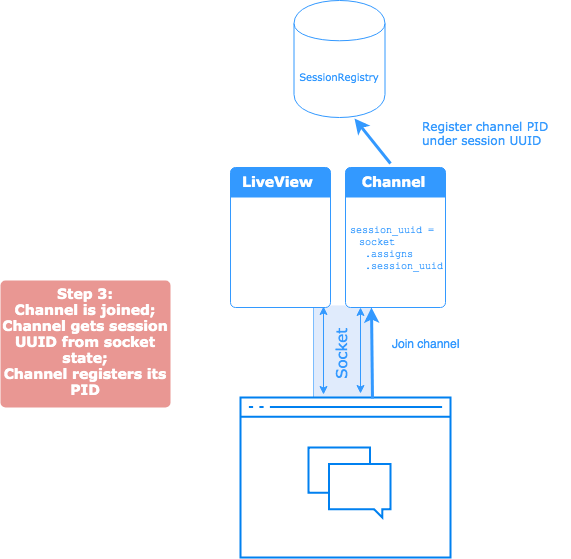
- The channel is joined; it takes the session UUID from its socket’s state and registers its PID under a key of that UUID.
Later…
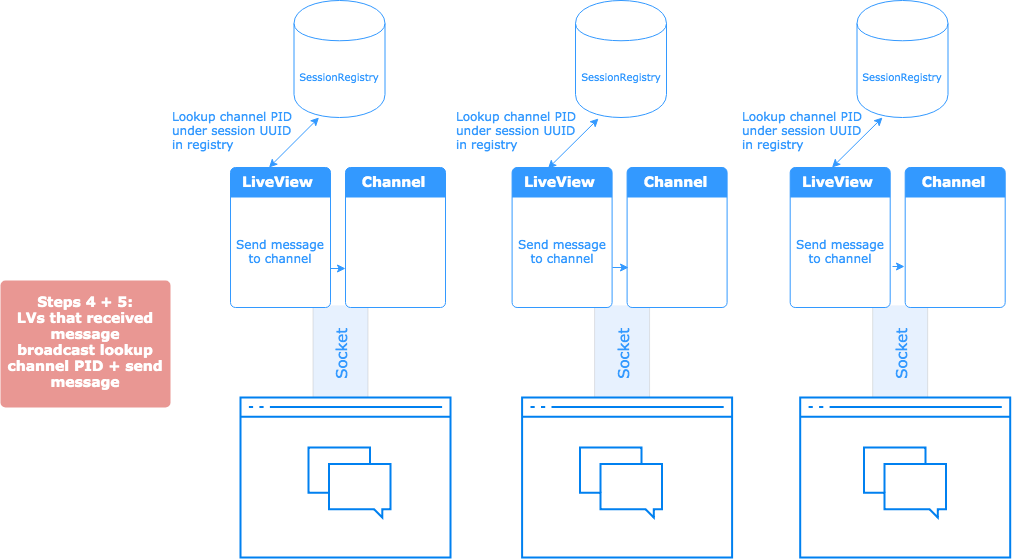
- When the user submits a new chat message, the LiveView processes that received the message broadcast will look up the channel PID under the session UUID in the registry
- Each live view will then send the message to the PID they looked up
Defining the Channel Registry
We’ll use a process registry, implemented with Elixir’s native Registry module, to keep track of the channel PID so that the LiveView can look up its associated channel in order to send it a message.
Its important to note that Elixir’s Registry module isn’t distribution friendly––if you look up a given PID created on one server on a totally different server, there’s no guarantee that it will refer to the same process. But! Since our channel shares a socket with the LiveView process, it is guaranteed that the live view and the channel are running on the same server.
We’ll tell Elixir’s Registry supervisor to start supervising a named registry called SessionRegistry when our app starts up:
# application.ex

def start(_type, _args) do
    children = [
      Phat.Repo,
      PhatWeb.Endpoint,
      PhatWeb.Presence,
      {Registry, [keys: :unique, name: Registry.SessionRegistry]}
    ]

    opts = [strategy: :one_for_one, name: Phat.Supervisor]
    Supervisor.start_link(children, opts)
  end
We want to register our channel PID when the channel is joined. But we need to store the PID under a unique key that the live view can use to look it up by later. So, we need to create such an identifier and find a way to make it available to both the live view and the channel.
Sharing the Session UUID
When the LiveView first mounts via the controller, we’ll create a unique identifier––a session UUID––to store in the live view’s state:
# lib/phat_web/controllers/chat_controller.ex

def show(conn, %{"id" => chat_id}) do
  chat = Chats.get_chat(chat_id)
  session_uuid = Ecto.UUID.generate()
  LiveView.Controller.live_render(
    conn,
    ChatLiveView,
    session: %{
      chat: chat,
      current_user: conn.assigns.current_user,
      session_uuid: session_uuid
    }
  )
end

# lib/phat_web/live/chat_live_view.ex

def mount(%{chat: chat, current_user: current_user, session_uuid: session_uuid}, socket) do
  ...
  {:ok, assign(socket,
    chat: chat,
    message: Chats.change_message(),
    current_user: current_user,
    users: Presence.list_presences(topic(chat.id)),
    username_colors: username_colors(chat),
    session_uuid: session_uuid,
    token: Phoenix.Token.sign(PhatWeb.Endpoint, "user salt", session_uuid)
  )}
end
In the mount/2 function of our live view, we store the session UUID in the socket’s state so that we can use it to look up the channel PID later. We also encode the session UUID into a signed Phoenix.Token so that we can put it on the page and use it when we join the channel from the client-side.
# lib/phat_web/templates/chat/show.html.leex

<%= tag :meta, name: "channel_token", content: @token %>
Let’s take a look at how we will give our channel access to this token.
When we send the socket connection request from the browser, we hit the connect/3 function of our extended Live View socket, PhatWeb.LiveSocket. At this time, we don’t have access to the Live View process’s representation of the socket, but we do have access to the channel’s representation of the socket.
We need to give the channel awareness of the session UUID. So, we’ll include the signed token from the page in the socket connection request and use connect/3 to store the session UUID in the channel’s socket state.
We’ll include the token in our socket connection request on the front-end:
// assets/js/app.js
const channelToken = document.getElementsByTagName('meta')[3].content
const liveSocket = new LiveSocket("/live", {params: {channel_token: channelToken}})
liveSocket.connect()
And we’ll have the PhatWeb.LiveSocket.connect/3 function verify the token, extract the session UUID and store it in the channel socket’s state:
# lib/phat_web/channels/live_socket.ex

def connect(params, socket, _connect_info) do
  case Phoenix.Token.verify(socket, "user salt", params["channel_token"], max_age: 86400) do
    {:ok, session_uuid} ->
      socket = assign(socket, :session_uuid, session_uuid)
      {:ok, socket}

    {:error, _} ->
      :error
  end
end
Registering The Channel Process
Now, when we join the channel, we can look up the :session_uuid in the channel socket’s state and use it to register the channel’s PID in the SessionRegistry under a key of this UUID:
# lib/phat_web/channels/chat_channel.ex

defmodule PhatWeb.ChatChannel do
  use Phoenix.Channel

  def join("event_bus:" <> _chat_id, _message, socket) do
    Registry.register(Registry.SessionRegistry, socket.assigns.session_uuid, self())
    {:ok, socket}
  end
end
Now our registry is up and running, and we’re registering a given channel PID under a unique identifier (session UUID) that live view with which the channel shares a socket connection is aware of.
We’re ready to have the live view send a message to its channel!
Sending Messages to the Channel
Let’s recap the “new chat message” process so far:
-
A user submits the “new message” form and sends a
"new_message"event to the live view -
The live view responds to this event by updating its own socket’s state, re-rendering and broadcasting the
"new_message"event to all the live view processes subscribing to the topic for this chat room, i.e. the processes that represent the other users in the chat room. -
The live view processes receive this message broadcast and respond to it by updating their own state and re-rendering. They also
senda message to themselves that they will process once they finish re-rendering. - The live view processes responds to the message they sent themselves, telling themselves to send a message to the channel with which they share a socket.
Now our live views have what they need to look up their associated channel. They are storing the same session UUID in state that the channel used to register its PID in the SessionRegistry. So, our live views can look up the channel PID and send a message to that PID.
# lib/phat_web/live/chat_live_view.ex

# handle the broadcast of the "new_message" event from the live view that received it from the user
def handle_info(%{event: "new_message", payload: state}, socket) do
  send(self(), {:send_to_event_bus, "new_message"})
  {:noreply, assign(socket, state)}
end

# handle the message sent above, after re-rendering the template
def handle_info({:send_to_event_bus, msg}, socket = %{assigns: %{session_uuid: session_uuid}}) do
  [{_pid, channel_pid}] = Registry.lookup(Registry.SessionRegistry, session_uuid)
  send(channel_pid, msg)
  {:noreply, socket}
end
Each live view process shares a session UUID with the channel that was joined on its socket. In this sense, each live view has an “associated” channel. By registering the channel PID under this session UUID, the given live view can look up its associated channel’s PID and send a message to that channel and that channel only.
Next up, we need to teach our channel to respond to this message.
Part IV: Sending Messages from the Channel to the Front End
In this section, we’ll focus on the following portion of our process:
- The channel receives the message from the live view and pushes it out to the front-end
-
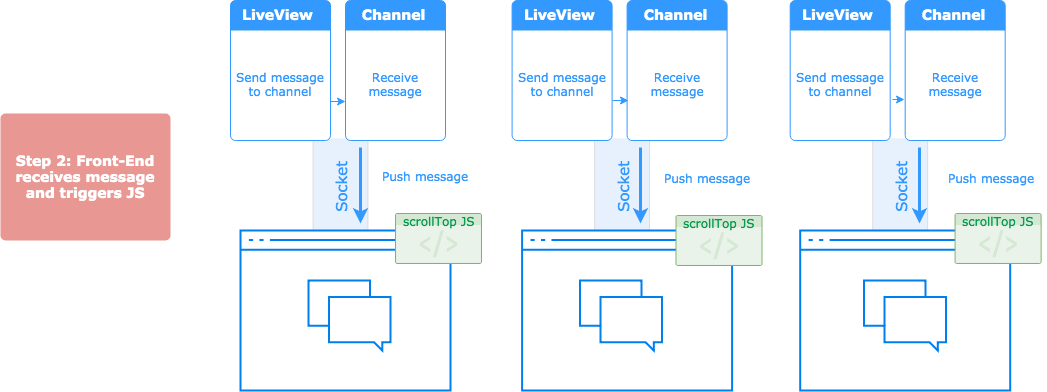
The front-end receives the message and responds by triggering our
scrollTopadjustment JavaScript
Here’s a closer look:
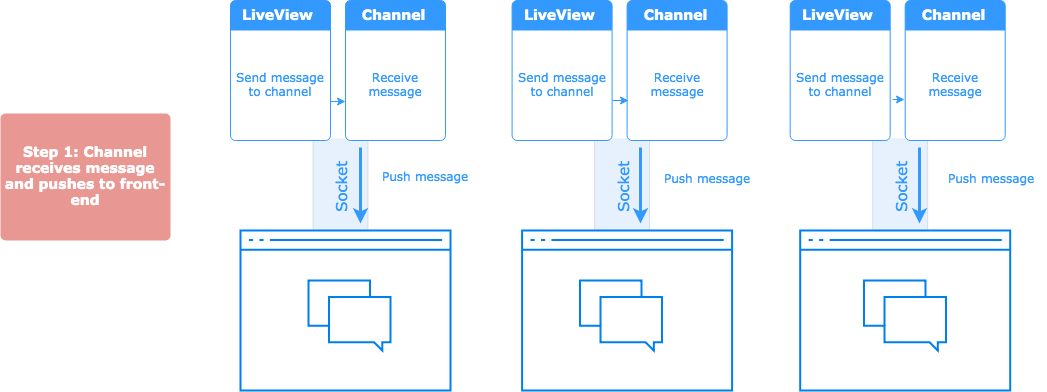
Receiving Messages in the Channel
We need to define a handle_info/ in the ChatChannel that knows how to respond to "new_message" messages by pushing them down the socket to the front-end.
# channel
def handle_info("new_message", socket) do
  push(socket, msg, %{})
  {:noreply, socket}
end
Responding to Messages on the Front-End
On the front-end, our channel JS is ready and waiting to fire:
// assets/js/app.js

channel.on("new_message", function() {
  const targetNode = document.getElementsByClassName("messages")[0]
  targetNode.scrollTop = targetNode.scrollHeight
})
Now, right after the page re-renders, the channel will receive the "new_message" message and push it to the client which is listening for just this event. The client reacts by firing our scrollTop adjustment JS and the user experiences a responsive UI––a chat window that automatically and seamlessly scrolls down to accommodate new messages in real-time.
Conclusion
We’ve seen that a seeming “limit” of LiveView can be surpassed by incorporating available Phoenix real-time tools––in this case Phoenix Channels. The work in this post raises the question: “What should LiveView be capable of?” Is the extension of LiveView with a custom Phoenix Channel a violation of the “purpose” of LiveView? Does such a use-case mean we should eschew LiveView in favor of Channels?
I think there are still distinctive advantages to using LiveView to back a feature like our chat app. Almost all of the chat functionality is handled in less than 100 lines of LiveView code. This is as opposed to all of the Channel back and front-end code that you would otherwise write. So, I would like to see LiveView become more extensible and configurable, making it easier to incorporate custom channels out-of-the-box.